Table of Contents
What is SSH?
“Secure Shell” (in short SSH) on one hand is a network protocol, on the other hand it is the software to create a secure, encrypted connection between 2 distant computers.
Requirements for SSH connectsions
The first requirement is a sever, which has an active and configured “SSH daemon” (short sshd) so a remote client can request an SSH session.
The second requirement is a client, which (dependent on your OS) is already preinstalled or has to be installed afterwards.
MacOS and Linux have an SSH client pre installed, Windows needs something like Putty.
The third requirement is a network, which connects the server and the client so they can speak with each other. This connection can be directly over a LAN network or via the internet through many many routers.
How to create an SSH connection?
Lets define our example network:
Server: 192.168.0.1/24
Client: 192.168.0.2/24
Now we need the username and password which allows us to connect to the server.
Username: kevin
Password: ********
On Linux or MacOS you can just open a terminal and enter the following command:
ssh kevin@192.168.0.1The username is entered before the @ symbol, the host IP or domain name is entered after the @
ssh <username>@<host>After that you are asked to enter the password of the required user. Don’t get confused if you don’t see any letters or * on the screen, the terminal knows what you are typing, its just not outputting the content on the terminal for security reasons.
If you put in the correct password you are now logged in on the server via SSH.
Alternative authentication method – Public-Key-Auth
As we all know a username and password can be “leaked” very quickly and therefore is not the safest way to authenticate a user.
A good alternative is the method of “Public-Key Authentication”.
Basic principal is the following:
The client creates a key pair – a “public” and a “private” Key. As you can probably image, the private key should NOT be shared in any way possible. The public key will be configured on the server to grant you access to a given user without having to know the password.
Creating a key pair (Linux and MacOS)
ssh-keygen -t rsaAfter entering the command you will be asked where the key pair should be saved and if the private key should have an additional password to use it.
Usually you should keep the default path for the SSH key pair (~/.ssh/), if you want to use a password for your private key is on you.
The folder ~/.ssh/ now has 2 files:
| id_rsa | Private key |
| id_rsa.pub | Public key |
You can choose which type of cryptography is used behind each key pair when you create the SSH key pair.
Most common methods are:
- RSA
- ECDSA
- ed25519
But dependent on how up2date your server and or client are you can only use some older or newer cryptography methods.
How to add my public key to my server?
As seen above you can find your public key in ~/.ssh/id_rsa.pub
MacOS or Linux only: You can also copy the content of a file to your clipboard via the command pbcopy:
pbcopy < ~/.ssh/id_rsa.pubNow connect to your server (via username and password or something like FTP) and create the following file:
~/.ssh/authorized_keys
Now can enter your previously copied public key into this file. Here it is important that one line in this file should be one public key.
So if you have multiple public keys (because you have many computers having access to your server) just enter each public key in a new line.
Example
On the client (192.168.0.2) we created a key pair in ~/.ssh/ and we already copied the public key.
Now we connect to our server via ssh kevin@192.168.0.2 and the predefined password.
Now we open the file ~/.ssh/authorized_keys with for example VIM and input our copied public key – save and quit the file after that.
If everything is working correctly you should be able to login to the server WITHOUT ENTERING YOUR PASSWORD.
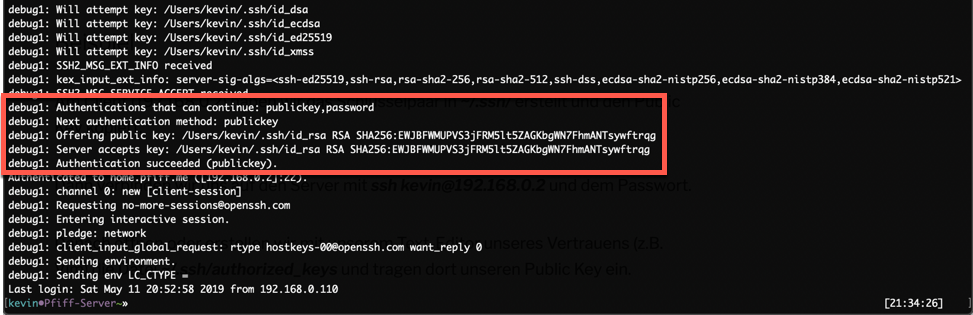
You can check that via the “verbose output” of the ssh command:
ssh -v kevin@192.168.0.2