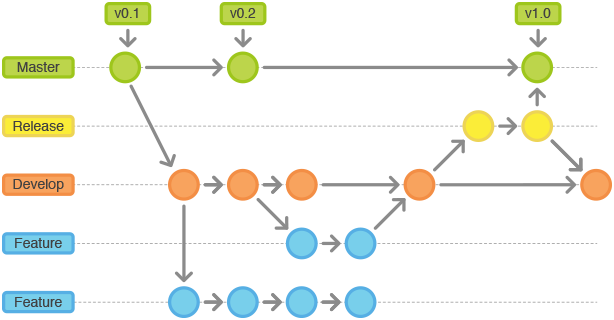
Now that we have basically understood what GIT branches, merging, rebasing and remote repositories are we can now talk about the “categorization” of branches.
Lets take Bitbucket as example. On bitbucket we can set a “type” of what our branch should represent when we create a new branch via the web interface:
Feature
Feature branches should only contain new software which extend your project. After creating the branch it is automatically prefixed with feature/<branch-name>
Release
This branch type allows you to group together features, which have already been “finished” in their own branch but have not yet been merged into the master branch and therefore created a “new version” for your software.
Therefore release branches are used to test and polish a certain release before it is public. While this is in progress the development team can focus on creating new features or other bugfixes.
After creating a branch it is automatically prefixed with release/<branch-name>
Bugfix
Bugfix branches should only contain bugfixes for already published or release branches. After creating a branch it is automatically prefixed with bugfix/<branch-name>
Hotfix
Hotfixe branches are another variant of bugfixes, but here we need to “quickly” add a fix for a problem which has already been published to the production branch. After creating a branch it is automatically prefixed with hotfix/<branch-name>
Other
Of course you can create branches which don’t fit any of the above “categorization”. These branches won’t get a prefix.
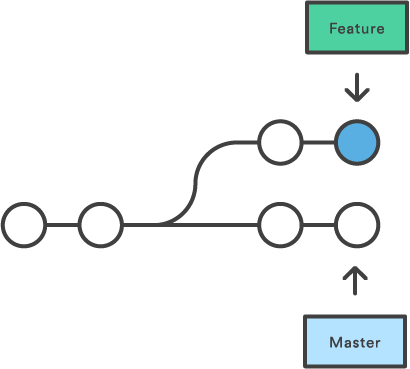
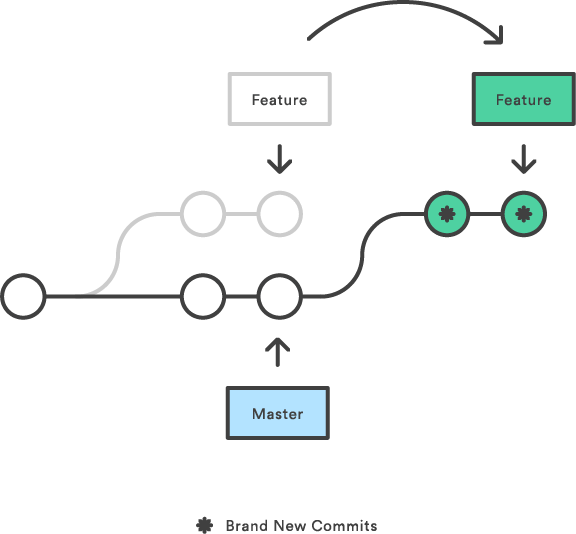
In the post “Merging” we already explained one method how to apply changes from one branch to another. “Rebasing” is similar but the applied changes come from a “different” direction than from merging.
“Rebasing” allows you to move the point of where you started your branch.
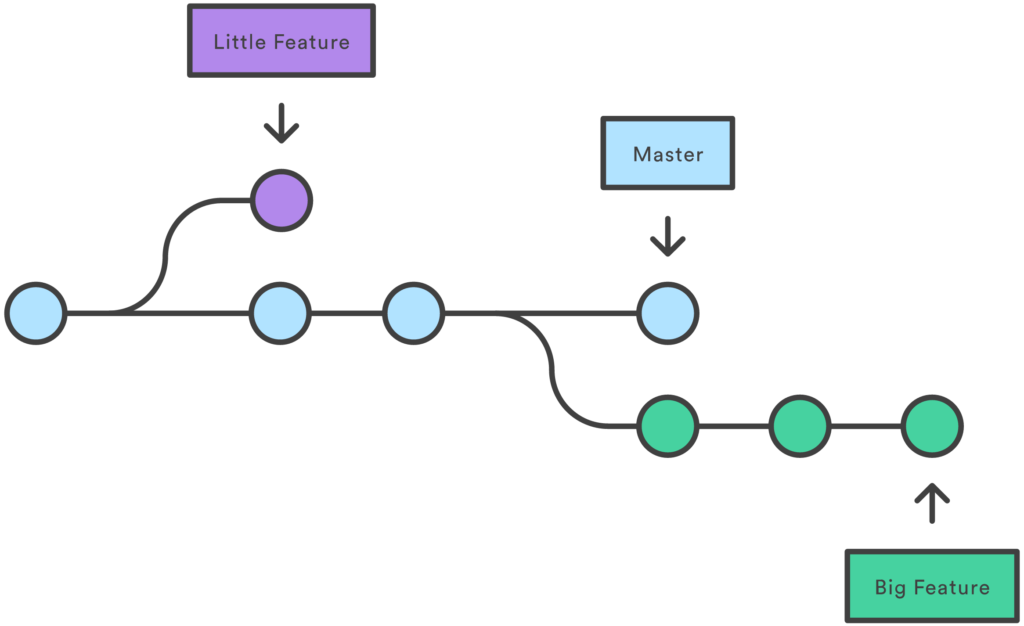
So on the master branch we have done 2 commits, then created a Feature branch from that point in the repository but also added 2 more commits to the master branch after creating the feature branch.
The current commit when creating a branch is called the “base” for this new branch.
But if you add more commits to the master branch after you created the feature branch these changes will not be visible to the feature branch. But what if you want to have these changes in your feature branch but don’t want to merge the feature branch into the master?
With that you now can do a “rebase” on the currently active feature branch:
git rebase master
With this command we basically perform this “transformation” in the repository:
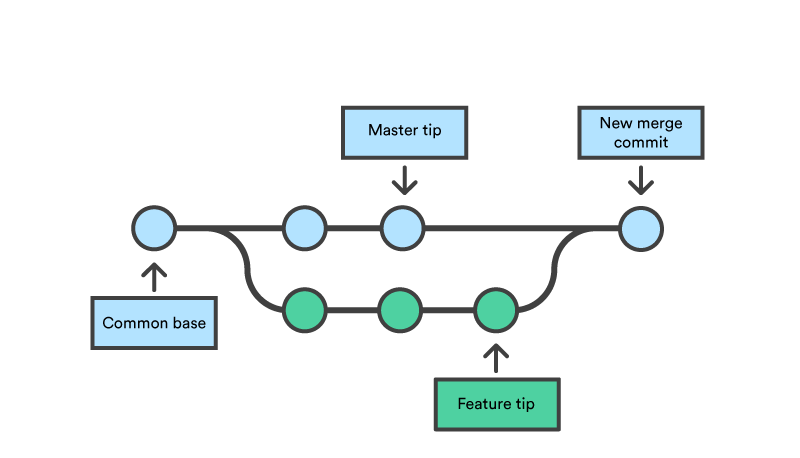
Merging is the act of applying the changes from one branch onto another branch. The above visualization shows you 2 different branches which finally come together in a final commit which is accomplished by a merge.
Command
git merge <branch-name>
With this command the currently active branch “recieves” the changes from the branch in the given paramenter in the command
If we take the example from “branches” you can execute the following command to apply to changes from “small-feature” to the master branch. (It is required that you are currently on the master branch in the command line)
With that the 1 line from the small-feature branch will be added to the file in the master branch.
Merge Conflict
GIT usually tries to merge the code itself as good as possible.
But sometimes GIT doesn’t know which side is correct and therefore produces a “merge conflict”.
When does a merge conflict occur?
A merge conflict occurs if you edit the same file at the same line in 2 different branches and try to merge these branches.
How does a merge conflict look like?
Lets stay with the example from “branches” but with the following adaptations:
On the master branch the content of source.txt has been changed from “master” to “master-old”.
On the small-feature branch the content from source.txt has been changed from “master” to “master-new”.
Now we perform a git merge small-feature while the master branch is active. With that we now get the following output:
Auto-merging source.txt
CONFLICT (content): Merge conflict in source.txt
Automatic merge failed; fix conflicts and then commit the result.
Now the content of source.txt looks like this:
<<<<<<< HEAD
master-old
=======
master-new
small-feature
>>>>>>> small-feature
As you can see GIT adds a few lines here:
<<<<<<<
Start of the merge conflict section
=======
Separates the 2 different content from the 2 given branches
>>>>>>>
End of the merge conflict section
How to solve a merge conflict?
Basically you have to manually “clean up” your source code, fix your logic and remove everything GIT added automatically.
In our example we want to stick with the changes from the master branch but also keep the new line from the small-feature branch.
With that our new content of our source.txt looks like this:
master-old
small-feature
After editing our file and looking at the git status we can see:
On branch master
You have unmerged paths.
  (fix conflicts and run "git commit")

Unmerged paths:
  (use "git add <file>..." to mark resolution)

    both modified:      source.txt

no changes added to commit (use "git add" and/or "git commit -a")
This means due to the fact, that we now edited our source.txt again, we have to add and commit our newly “merged” file again to the repositoy.
git add source.txt
git commit -m "merged"
The final git log looks something like this:
commit f9997203d5f7887ca30b4e69752291706d81755d (HEAD -> master)
Merge: dc50e32 2d79e70
Author: Kevin Pfeifer <kevin.pfeifer@sunlime.at>
Date:   Sat Jun 22 21:09:31 2019 +0200

    merged

commit dc50e3242da6cc17d822e3adf04ae4ca9edd62b1
Author: Kevin Pfeifer <kevin.pfeifer@sunlime.at>
Date:   Sat Jun 22 20:53:35 2019 +0200

    changed master to master-old

commit 2d79e708b4f7aa2dd4898a990bfd464b8a6080f4 (small-feature)
Author: Kevin Pfeifer <kevin.pfeifer@sunlime.at>
Date:   Sat Jun 22 20:53:14 2019 +0200

    changes master to master-new

commit b71b422594ecaf924909cd7477ee73b45a2c9685
Author: Kevin Pfeifer <kevin.pfeifer@sunlime.at>
Date:   Sat Jun 22 20:52:32 2019 +0200

    added small-feature

commit 3958f0b2f8f3f0473a6ef6194df4077ac4e45dc5
Author: Kevin Pfeifer <kevin.pfeifer@sunlime.at>
Date:   Sat Jun 22 20:52:21 2019 +0200

    master file created
The base branch is usually the “master” branch. This branch is always the default branch, which is automatically created when you create a repository.
But this branch doesn’t have to be always present in every repository! Theoretically you can create a new branch after committing your first commit and just do everything on that new branch instead of the master ranch. But this is not very common because most of the time the “master” branch is the common ground where everything comes back together.
Most important commands
Show all available branches
git branch
You will also be shown which branch is currently active in your current environment. But to create new branches you will have to have at least 1 commit in your repository.
Create a new branch
git checkout -b <branch-name>
With this command you will create a new branch on the basis of your currently active branch. If you haven’t created any other branches in your repository it will always take the “master” branch as basis for your new branch.
Difference between 2 branches
git diff <branch1> <branch2>
Example
Let’s create a new, empty folder and init our GIT repository.
git init
After that we create a text file and commit it to the “master” branch.
With that you know the basics of what GIT branches are, how to create them and compare branches.
Of course the above shown method is not very “nice” to look at. Therefore many code editors have integrated GIT-Plugins, which allow you to do the above in the GUI and show you a better visual representation of how branches differ.
A “software repository” is a “project archive” which contains all the source code for a given software where you can see when someone changed the source code.
There are many different software implementations like
Apache Subversion (SVN)
Mercurial
GIT
All upcoming posts will be based on “GIT” since its the versioning system I am most comfortable with.
Advantages
Multiple developers can work on a specific software simultaneously.
It’s easy to jump back to an older state of source code without discarding the current state of development.
You can mark “releases” to deliver specific versions of your software to customers and therefore better track bugs for specific versions.
There are many online version control platforms like Github or Bitbucket which allow you to create and manage repositories via the browser or an app. These online version control platforms also allow you to push/pull commits to/from the online repository and manage issues for e.g. open source projects.
Disadvantages
New developers need to learn the “GIT-Workflow” which can take some time to adjust to.
GIT not only allows local repositories but also “remote repositories”.
As you can probably already guess the “remote repository” is basically the same as the local repository but with the difference, thats its on another computer (which usually is connected via a network to your computer).
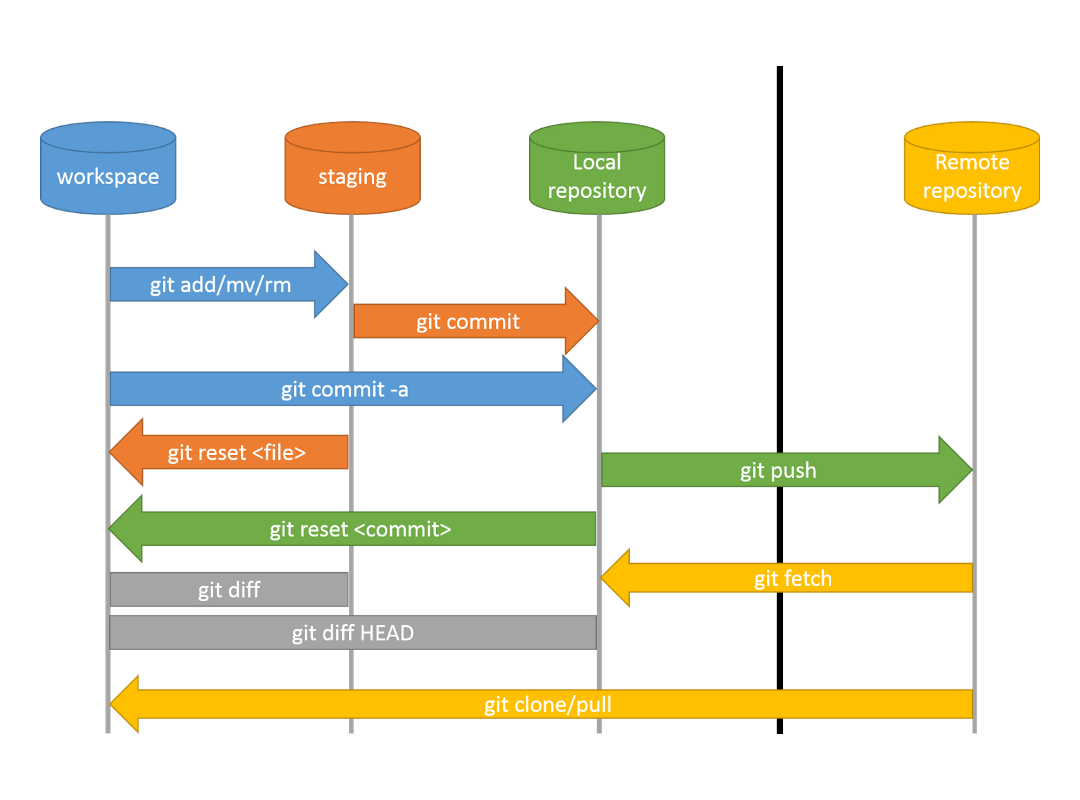
With that there are separate commands to “download” the state of the remote repository to your local repository (pull) and vice versa “upload” the state of your local repository to the remote repository (push).
Here we have a nice illustration which commands do what with the specific parts of a local and/or remote repository.
One important thing here! git push as well as git pull only update your currently active branch in the CLI, not all branches you have locally already created!
When you perform a git pull you will see when “something” changed on other branches BUT these changes to all branches are NOT APPLIED to your local files.
The reason behind that is, that git pull basically calls git fetch, which “downloads” the current state of the remote repository to you local repository AND after that performs a git merge between your currently active local branch and the corresponding remote branch.
The git fetch basically just updates the “GIT structure” how changes are safed in GIT but it does NOT apply the changes directly to any branches!
Only after a git merge between local and remote branch you will see the changes in your files as well.
This “staging” kann be finally added to the repository via a “git commit”.
Commit
Command: git commit -m “<message>”
Transfers all files from “staging” via a new “commit” into the repository.
Reset
Command: git reset <file> oder git reset <commit>
Removes given files from “staging”. But you can also use git reset <commit> to set the repository to an older commit and therefore an older version of your software.
Log
Command: git log
Shows the last commits inkl. messages in a list.
Diff
Command: git diff
Shows the difference between the current workspace and the files, that have been added to “staging”. Can also be specifically called for a file git diff <file> to just show the changes in that given file.