Gulp-Example for SCSS, JS and BrowserSync

The following setup is based on “tristanisfeld” which I found on Github. See https://gist.github.com/tristanisfeld/9deea503260324f5e9b0

The complete setup: DOWNLOAD

In the following setup you will have the ability to:

  • Generate one minifed CSS from SCSS files (incl. Autoprefixer)
  • Concatinate and minify multiple JS Modules into one JS file
  • use “Browsersync” so you don’t need to reload the tab everytime

Also there will be a boolean variable called “production” which activates or deactivates the “minification”, “uglyfication” and generation of sourcemaps.

package.json

{
  "name": "my_custom_gulp_setup",
  "author": "Kevin Pfeifer",
  "license": "WTFPL",
  "version": "2.0.0",
  "description": "Generate minified CSS and JS from source files",
  "main": "index.js",
  "scripts": {
    "test": "echo \"Error: no test specified\" && exit 1"
  },
  "devDependencies": {
    "browser-sync": "^2.26.7",
    "gulp-autoprefixer": "^7.0.1",
    "gulp-concat": "^2.6.1",
    "gulp-if": "^3.0.0",
    "gulp-load-plugins": "^2.0.1",
    "gulp-minify-css": "^1.2.4",
    "gulp-rename": "^1.4.0",
    "gulp-sass": "^4.0.2",
    "gulp-sourcemaps": "^2.6.5",
    "gulp-uglify-es": "^2.0.0",
    "gulp-watch": "^5.0.1",
    "node-sass": "^4.13.0"
  },
  "dependencies": {
    "gulp": "^4.0.2"
  }
}

Don’t know what the package.json does? See npm vs. yarn – Package Managers for JavaScript

gulpfile.js

const gulp = require('gulp'),
      gulpLoadPlugins = require('gulp-load-plugins'),
      plugins = gulpLoadPlugins(),
      config = require('./gulp/config');

// --------------------function to get tasks from gulp/tasks
function getTask(task) {
  return require('./gulp/tasks/' + task)(gulp, plugins, config);
}

// ---------------------------------------------- Gulp Tasks
gulp.task('sass',             getTask('sass'));
gulp.task('scripts',          getTask('scripts'));
gulp.task('styles',           getTask('styles'));
gulp.task('watch',            getTask('watch'));
gulp.task('browsersync',      getTask('browsersync'));

// --------------------------------------- Default Gulp Task
gulp.task('default', gulp.series('watch'));

Each Gulp setup starts with a “gulpfile.js“.

  • gulp = require(‘gulp’)
    • Load the gulp default functionality into the variable gulp
  • gulpLoadPlugins = require(‘gulp-load-plugins’)
    • Load the additional modul “gulp-load-plugins” which helps us use gulp modules later on
  • plugins = gulpLoadPlugins()
  • config = require(‘./gulp/config’)
    • Load the config file “./gulp/config” into the variable config
function getTask(task) {
  return require('./gulp/tasks/' + task)(gulp, plugins, config);
}

Here we define a rather generic function which helps us load tasks from the folder “./gulp/tasks/“. With this function gulp allows us to have 1 file per task and not cram all the tasks into the gulpfile.js

gulp.task('sass',             getTask('sass'));
gulp.task('scripts',          getTask('scripts'));
gulp.task('styles',           getTask('styles'));
gulp.task('watch',            getTask('watch'));
gulp.task('browsersync',      getTask('browsersync'));

Here we load all the tasks from each JS file in “./gulp/tasks/“.

Gulp Plugin Loader

Since we don’t want to require every module inside every seperate task file we can use the previously loaded module “gulp-load-plugin” to provide us all the modules in one variable.

Basically this module does the following (so we don’t have to do it):

plugins.sourcemaps = require('gulp-sourcemaps');
plugins.concat = require('gulp-concat');
plugins.uglifyEs = require('gulp-uglify-es');

This happens at the start of the gulpfile.js in the following 2 lines:

gulpLoadPlugins = require('gulp-load-plugins'),
plugins = gulpLoadPlugins()

One important thing here is the fact, that the module changes the name of the loaded modules so we can more easily use it inside our tasks.

Node Module NameFunction name
gulp-sourcemapssourcemaps
gulp-concatconcat
gulp-uglify-esuglifyEs

And with that we now have a variable “plugins” from which we can access all modules which are defined in the package.json.

Structure of tasks

// =========================================================
// Gulp Task: sass
// Description: transpiles sass, adds sourcemaps, prefixes
// npm install --save-dev node-sass gulp-sass gulp-sourcemaps gulp-autoprefixer gulp-load-plugins
// =========================================================

module.exports = function(gulp, plugins, config) {
  return function() {
    return gulp.src(config.sass.src)
      .pipe(plugins.if(!config.production, plugins.sourcemaps.init()))
      .pipe(plugins.sass(config.sass.opts).on('error', plugins.sass.logError))
      .pipe(plugins.autoprefixer())
      .pipe(plugins.if(!config.production, plugins.sourcemaps.write('.')))
      .pipe(gulp.dest(config.sass.dest));
  }
};

Now what does each line?

module.exports = function(gulp, plugins, config) {

With the “module.exports” we define, that this function can be included in other JS files. The parameters used inside the function() are the same gulp, plugins and config variables used in our generic getTask(task) function.

return function() {

The actual functionality of the task needs to be wrapped inside a function() so gulp can use it as a “Callback” in the background and therefore allow tasks to be executed in parallel or series.

return gulp.src(config.sass.src)
   ...

Now the “usual” Gulp code is being done where the different functionalites of the tasks are defnied. You just need to be sure that a valid “Gulp stream” is being returned here.

Difference between dev and production build

The above example already has the “if production” logic implemented.

.pipe(plugins.if(!config.production, plugins.sourcemaps.init()))

The base module here is called “gulp-if“. See https://www.npmjs.com/package/gulp-if

This means, if we have “production” set to false in our Config-JSON gulp will also create additional Sourcemaps for the SASS.

In the “scripts” tasks we also have a similar code example:

.pipe(plugins.if(config.production, plugins.uglifyEs.default(), plugins.sourcemaps.init()))

Autoprefixer settings

With the current version of Autoprefixer it is not recommended to define the autoprefixer rules inside the JS-File and use a separate file named “.browserslistrc” instead.

You can see all available rules here: https://github.com/postcss/autoprefixer#options

# Browsers that we support

last 2 version
> 1%
maintained node versions
not dead

config.js

The following JSON describes how the gulp setup should behave and therefore how the different tasks should output their code.

  • opts => Options for the corresponding Gulp task
  • src => Path to the source files
  • dest => Path where the generated files should be placed

There is also inline documentation present for basically every option

module.exports = {
  production: false,
  rename: {
    min: { suffix: '.min' }
  },
  // --------------------------------------------- browsersync
  browsersync: {
    opts: {
      proxy: "http://localhost", // The URL of the website you want to browsersync
      port: 4000, // The port, from which the browsersync tab will be opened
      serveStatic: [{
        route: '/', // The route, from which the "live" website serves CSS and JS files
        dir: './dist' // Your local path coming from the gulpfile.js where the newly local generated files are laying
      }],
    },
    watch: [
      './dist/assets/css',
      './dist/assets/js'
    ]
  },
  // ---------------------------------------------------- sass
  sass: {
    src: [
      "./source/sass/**/*.scss",
    ],
    opts: { }, // add sass options here
    dest: "./dist/assets/css"
  },
  // ------------------------------------------------- scripts
  scripts: {
    src: [
      'source/js/main.js'
    ],
    base: 'source/js', // common base folder of all concatenated JS files so sourcempas are working correctly
    filename: 'main.js', // filename of outputted, concatenated JS file
    dest: "./dist/assets/js" // folder where the JS files should be populated
  },
  // -------------------------------------------------- styles
  styles: {
    src: [
      "./source/css/**/*.css",
    ],
    dest: './dist/assets/css'
  },
};
Gulp – Automating Tasks

What is Gulp?

Gulp is a Node.js based tool to allow recurring tasks to be automated.

Here some typical examples z.B.

  • (Re-)Generate CSS when you change SASS files
  • (Re-)Generate JS when you change JS files
  • Use sourcemaps and not minified JS/CSS in a local environment but remove sourcemaps and use minified versions on live environment

Gulp 3 vs Gulp 4

Currenty (Mai 2021) ithe current verson of Gulp is 4.0.2
This version is a breaking change in comparison to the old version 3.X

What has changed since Gulp 3?

Gulp 4 changed how the “Task” system works and now allows parallel and series tasks to be defined.

E.g. in the following Task named “default” Gulp executes the tasks “sass” and “scripts” in parallel:

gulp.task('default', gulp.parallel('sass', 'scripts'));

Besides “gulp.parallel” there is also “gulp.series

gulp.task('default', gulp.series('lint', gulp.parallel('sass', 'scripts'), 'deploy'));

In this example the task “lint” will be executed first. After it is done the tasks “sass” and “scripts” are executed in parallel and after that finally the task “deploy

To execute tasks iniside another task use:

(gulp.parallel('sass', 'scripts'))();

How all this comes together in a rather nice SCSS/JS/BrowserSync Setup see the next post.

React Library Example with multiple components

In the previous example you have seen how react basically works. In this example you will see how react works with multiple components.

index.html

<!DOCTYPE html>
<html lang="en">

<head>
  <meta charset="UTF-8">
  <meta name="viewport" content="width=device-width, initial-scale=1.0">
  <meta http-equiv="X-UA-Compatible" content="ie=edge">
  <title>App Layout Demo</title>
</head>

<body>
  <div id="root"></div>
  <script src="https://unpkg.com/react/umd/react.development.js"></script>
  <script src="https://unpkg.com/react-dom/umd/react-dom.development.js"></script>

  <script src="https://unpkg.com/babel-standalone"></script>

  <script src="Hello.js" type="text/jsx"></script>
  <script src="NumPicker.js" type="text/jsx"></script>
  <script src="index.js" type="text/jsx"></script>

</body>

</html>

Hello.js

class Hello extends React.Component {
  render() {
    return <h1>Hello There!!!</h1>
  }
}

NumPicker.js

function getNum() {
  return Math.floor(Math.random() * 10) + 1;
}
class NumPicker extends React.Component {
  render() {
    const num = getNum();
    let msg;
    if (num === 7) {
      msg = <h2>CONGRATS YOU WIN!</h2>
    } else {
      msg = <p>Sorry, you lose!</p>
    }
    return (
      <div>
        <h1>Your number is: {num} </h1>
        {msg}
      </div>
    );
  }
}

index.js

class App extends React.Component {
  render() {
    return (
      <div>
        <Hello />
        <NumPicker />
      </div>
    )
  }
}

ReactDOM.render(<App />, document.getElementById('root'));

The start of everything is the last line in the index.js

In this line the component <App /> will be rendered into the element with the id “root”.

The component <App /> has multiple components, which are <Hello /> as well as <NumPicker />. These components have to be defined before they are rendered. Thats why the order in which the JS files are placed in the index.html is important.

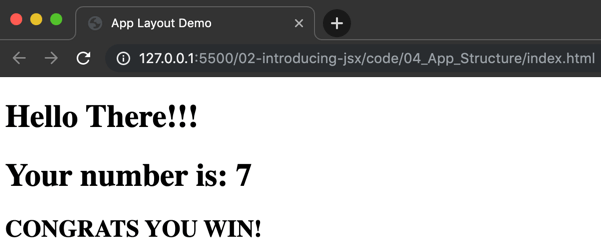
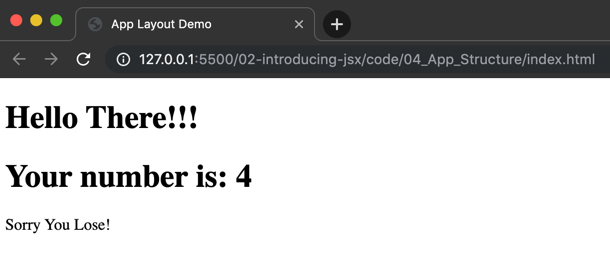
With that you get the output:

Or with the number 7:

Simple React Library Example

React can be used on your website by just adding some JS files from a CDN without having to setup a local Node.js instance.

Files

index.html

<!DOCTYPE html>
<html lang="en">
<head>
  <meta charset="UTF-8">
  <meta name="viewport" content="width=device-width, initial-scale=1.0">
  <meta http-equiv="X-UA-Compatible" content="ie=edge">
  <title>First Component</title>
</head>
<body>
  <div id="root"></div>

  <script src="https://unpkg.com/react/umd/react.development.js"></script>
  <script src="https://unpkg.com/react-dom/umd/react-dom.development.js"></script>

  <script src="https://unpkg.com/babel-standalone"></script>
  <script src="index.js" type="text/jsx"></script>
</body>
</html>

As you can see the index.html doesn’t contain very much:

  • The <head> contains only standard HTML5 meta tags and the title of the page, nothing React specific.
  • Directly after the <body> we only have a “root” element which is the base for our React app.
  • Before the </body> we can see some JS files which are partially external and internal:
    • react.development.js: Base React-Library
    • react-dom.development.js: React-DOM extension so React can interact with the DOM
    • babel-standalone: Babel is needed so JSX is possible
  • index.js: our React app

index.js

class Hello extends React.Component {
	render() {
		return (
			<div>
				<h1>Hello there!</h1>
				<p>I am a React Component!</p>
			</div>
		);
	}
}

ReactDOM.render(<Hello />, document.getElementById('root'));

So we define a component named “Hello“.
So we can render it via “<Hello />”.
Withing our component we have a render() funktion, which defines what happens when we render our Component.

At the end we just define, that our component “<Hello />” should be rendered into the element with the ID “root”.

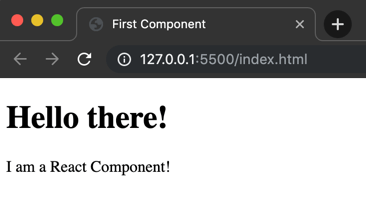
So we get the following output after opening our index.html:

It is important, that you cant “just” open the index.html directly. You instead have to create a local web-server due to CORS restricting the embeding of local JS files.

Otherwise you can copy the JS React code directly in the index.html, but thats not good pratice if your project gets bigger and bigger. An easy way to create a “Live Server” is to use the Visual Studio Code Editor and its plugin called “Live Server”.

JS Frontend Libraries & Frameworks

Library vs Framework

First lets explain the difference between a “Library” and a “Framework”.

Libraries are mostly “small” code bundles which allow the developer to extend the functionality of an already present application.
Examples for libraries are Moment.js, jQuery or Data-Driven Documents.

Frameworks are most of the time “bigger” and usually provide a distinct structure how data should be handled or saved. Frameworks often provide easier ways to reuse already written blocks of code and already have built in security features like XSS Protection and CSRF tokens.

Why do JS Frontend Libraries/Frameworks exist?

There are many different reasons why JS Frontend Libraries/Frameworks exist:

  • Performance
  • Complete separation between frontend and backend logic
  • New technology / developer doesn’t want to work with “old” technology

Whats the principal behind JS Frontend Libraries/Frameworks?

Lets take a typical PHP as basis:

  1. Browser requests website
  2. Web server gets request from browser and looks for the defined document root
  3. If there is a PHP file present it will be interpreted
  4. Now all Database queries are being executed which can theoretically take a lot of time
  5. The resulting HTML and connected CSS and JS will be returned to the browser

Point 4. is the important part here: The database query is executed immediately when the request is being proccessed by the web server.

Now in comparison a website built with a JS Frontend Frameworks

  1. Browser requests website
  2. Web server gets request from browser and looks for the defined document root
  3. Web server delivers HTML, CSS and JS without executing DB Queries
  4. The browser renders the HTML and CSS and interprets the JS
  5. In JS the client now executes extra AJAX requests to the web server to dynamically load the needed data.

Therefore the initial HTML is very small because usually in JS Framworks the DOM only consists of 1 “root” element in which all the virtual DOM is rendered by JS.

Main difference to PHP is the fact, that the dynamic content will be added by the client, not the server!

This has also the advantage, that the backend code to manage the dynamic code doesn’t need to worry about frontend code.

Currently popular JS Libraries/Frameworks (June 2020)

  • React
  • VueJS
  • Angular

Basically there is no “ultimate” framework which is best for all scenarios. But bellow you can see a short description of each framework so you can make your own decission.

React is a “light” Library/Framework, which only has a few basic concepts (like e.g. “Components”) to build your project. Therfore you don’t have to learn that much and the start is not that difficult.

You can also use react just as a library (see HERE), but on the example of Next.js you can see a whole framework which is built on React.

VueJS basically has the same features as React. But one main difference to React is the fact, that VueJS doesn’t built its virtual DOM with JSX. See HERE for a description of what the virtual DOM and JSX is.

Angular is a “larger” framework and therefore has much more functionality built in. Thats why its better suited for bigger projects because you can already use “finished” functionality and don’t have to build everything yourself. But understand, using and maintaining these already build code blocks can be kind of tricky especially while updating Angular.

Virtual DOM and JSX

Virtual DOM

One main reason behind JS Web-Frameworks is the “virtual DOM”. But what is the Virtual DOM and why is it better then the “original DOM”?

Each change in the “original DOM” triggers a “redraw” of the whole DOM in the browser which can be (dependent on your DOM) very resource intensive.

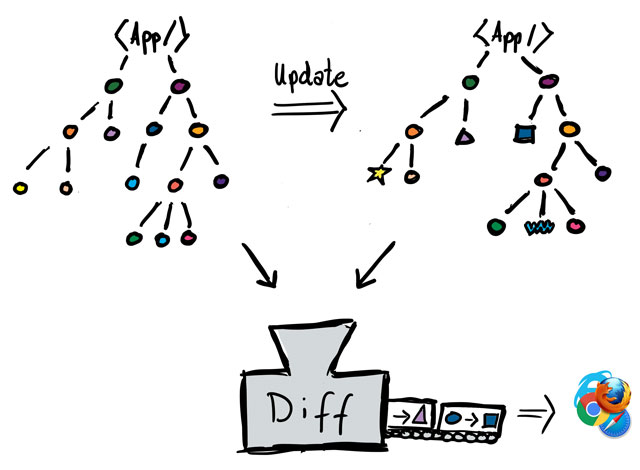
Changes in the “virtual DOM” happen only at the level of the elements which are changed (therefore more performant) and only the difference between the “old” DOM and the “new” DOM is then pushed to the browser.

Also not every little change is directly transfered to the “original” DOM but all changes are gathered together, performed on the virtual DOM and then this difference is pushed to the original DOM which also increases performance.

vdom
Source: https://reactjs.de/artikel/vdom-react/

JSX

JSX stands for Javascript XML or Javascript Syntax Extension and is an extension of the typical JavaScript grammar for React.

With JSX your are now “allowed” to write HTML in JS like that:

function render() {
  return <p>Hi everyone!</p>;
}

Native JavaScript would produce the following error:

Uncaught SyntaxError: Unexpected token <

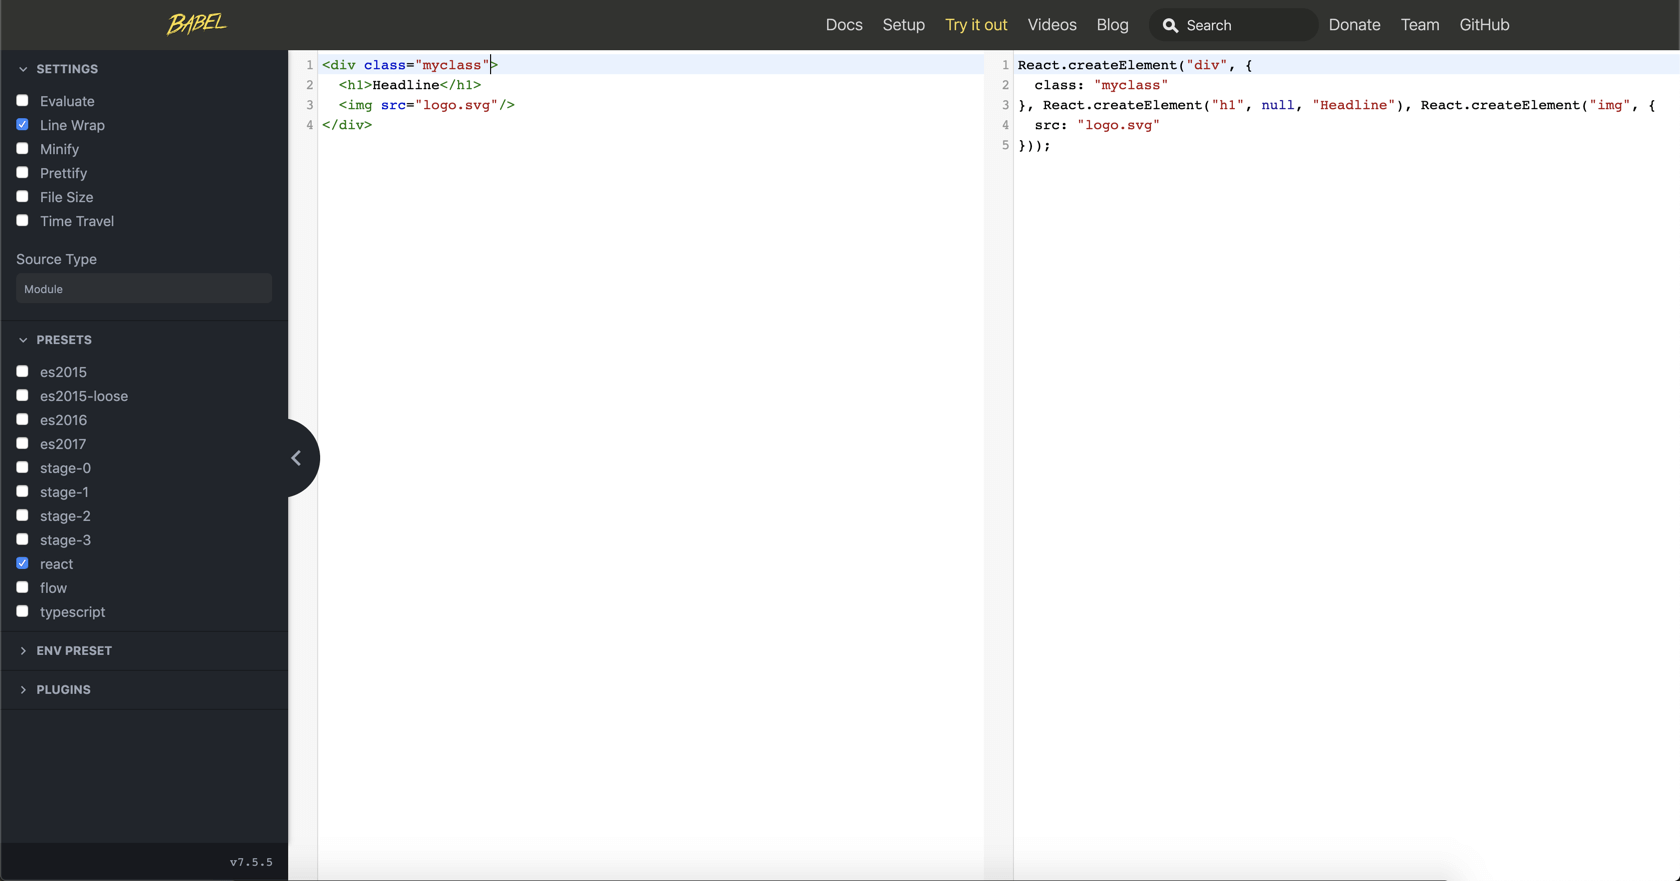
“React” uses Babel to directly transform “React” HTML-Code in JavaScript Code. See here Online Babel Compiler

Therefore in React you write HTML in your .js files, not your .html files.

See JSX in depth for more details.

npm vs. yarn – Package Managers for JavaScript

Package managers are generally used to use and manage already made and tested code parts in your own project. The 2 most common JavaScript package managers are npm and yarn.

What is a package?

Packages are JavaScript modules, which contain reusable code for your own project.

You can find all available JavScript Packages here: https://www.npmjs.com/

Each package can be dependent on other packages which are called “dependencies”. These dependencies are located in the package.json in the area “dependencies” and “devDependencies”. So if you install one package which is dependent on 3 other packages you will get a total number of 4 packages in your application.

What is NPM?

npm (“Node package manager”, released in 2010) will be automatically installed if you install Node.js to manage JavaScript packages.

What is yarn?

yarn is “another” Package-Manager (similar to NPM) developed by Facebook but it is not automatically installed via Node.js.

Released in 2016 yarn has been developed because in the past NPM wasn’t very performant and did’nt have all the features developers needed like lock files.

Command overview

Here an overview of which commands can be executed in NPM or in Yarn:

Commandnpmyarn
Install dependenciesnpm installyarn
Install packagenpm install [package]yarn add [package]
Install dev packagenpm install --save-dev [package]yarn add --dev [package]
Uninstall packagenpm uninstall [package]yarn remove [package]
Uninstall dev packagenpm uninstall --save-dev [package]yarn remove [package]
Updatenpm updateyarn upgrade
Update packagenpm update [package]yarn upgrade [package]
Global install packagenpm install --global [package]yarn global add [package]
Global uninstall packagenpm uninstall --global [package]yarn global remove [package]
https://alligator.io/nodejs/npm-yarn-cheatsheet/

But not all commands are named differently:

npmyarn
npm inityarn init
npm runyarn run
npm testyarn test
npm login (and logout)yarn login (and logout)
npm linkyarn link
npm publishyarn publish
npm cache cleanyarn cache clean
https://alligator.io/nodejs/npm-yarn-cheatsheet/

package-lock.json vs. yarn.lock

The package.json contains the desired packages you want to use in your application including the desired version of this package.

Usually a “version string” contains a special character like *, ^ or ~ (see https://devhints.io/semver for a detailed explenation)

Therefore the package.json alone is not enough to determine which package version should be installed in your application.

Thats why NPM generates a package-lock.json each time you execute “npm install” since version 5.x (May 2017).
Yarn already included this feature in its first version, but its file is named yarn.lock.

Which is better?

Basically yarn provides the same functionality as NPM. NPM has learned from its mistakes in the past and applied many features from yarn to itself.

Therfore its more of a preference which package manager you or your team uses. If your in a team you should only determine which of these 2 all developers should use to not get into more trouble then you need.

Other Package Managers

As you can see above there is not only 1 solution for package management in JavScript. Here are some more package managers:

Thread based vs. Event based

There are 2 main approaches how to handle requests from Clients to a web server:

Thread based

On a thread based system the web server creates one thread per request and all the work for this request is handled by that thread.

This also means, that the maximum of available threads on a computer determines how many concurrent users can connect to the web server.

Event based

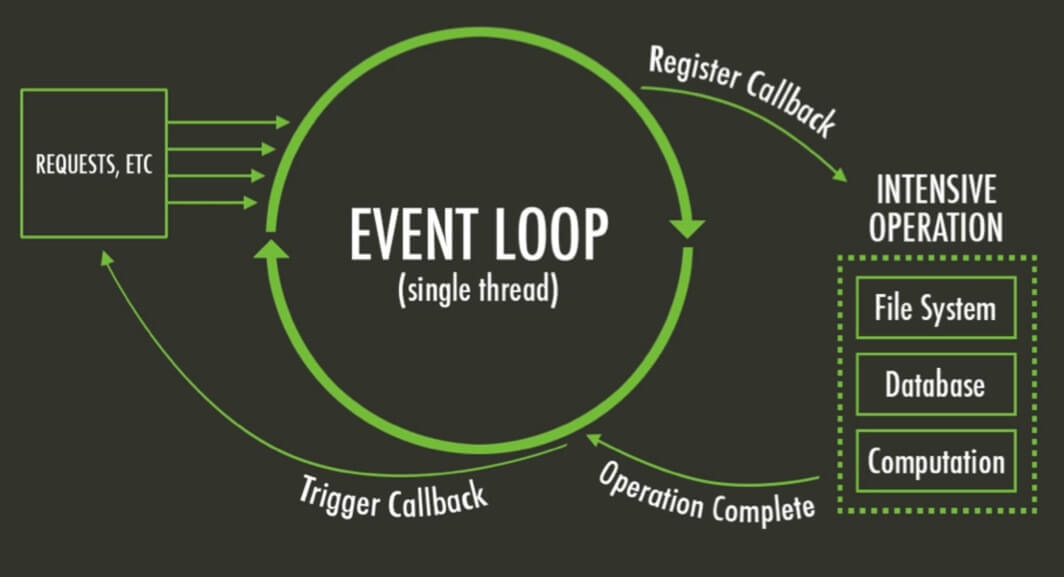
On an event based system every request will be put in a “queue” which then is processed by 1 web server thread.

With that you avoid the “overhead” of creating a new thread for each request.

But this also means, that e.g. a very complex and long request blocks all request since it needs to be done before all the other requests can be processed.

But due to the fact, that JavaScript can be written asynchronously no “blocking” can occur and therefore no (direct) performance problem can be felt by the end-user.

Node.js “Event Loop” visualized

Node.js Event Loop

Source: https://stackoverflow.com/questions/21596172/what-function-gets-put-into-eventloop-in-nodejs-and-js

What is Node.js?

Node.js is a framework built upon the JavaScript Engine “V8“, which is currently the most used JavaScript Engine and built into Google Chrome.

Node.js was developed by the need of a resource efficient, performant, “nonblocking I/O” Framework to deliver fast and quick websites.

Here is an example of a very basic web-server written in Node.js

const http = require('http');

const hostname = '127.0.0.1';
const port = 3000;

const server = http.createServer((req, res) => {
  res.statusCode = 200;
  res.setHeader('Content-Type', 'text/plain');
  res.end('Hello World\n');
});

server.listen(port, hostname, () => {
  console.log(`Server running at http://${hostname}:${port}/`);
});

Main requirement to run this code is the fact, that you need a Node.js version installed on your system (see https://nodejs.org)
The current LTS version is fine.

Now we can start the webserver with

node index.js

and can see the following output in the terminal

Server running at http://127.0.0.1:3000/

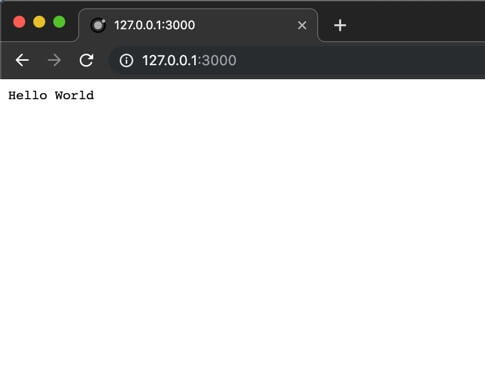
If we open up a browser with the given URL we see

Advantages of Node.js

  • Based on JavaScript there is very little to no new syntax to lean if you know the basics of JavaScript.
  • Node.js is event based (see HERE for more detials) and because of that very performant
  • Modularity with the Node-Package-Manager (NPM)

Disadvantages of Node.js

  • Backwards compatibility is somewhat a problem with upcoming Node.js version updates because the current development of the framework is so rapid.
  • The fact that Node.js works on an event loop implies only 1 thread has to carry all the work which can be overwhelmed by lots of requests and/or server logic.
  • Asynchron code notation can be tricky to understand and learn

Source: https://nodejs.org/de/about/