The “System Daemon” (short systemd) is a program, which has many tasks but the main tasks are initialising and manging services like the SSH-Daemon (sshd) or a webserver like NGINX.
Why do I need the systemd?
Just like on your desktop not all programs are running at the same time its the same on a server.
With the systemd you configure which programs should be automatically started when you start/reboot your server. But also you have other commands to manage already running or not running services.
Most important commands
systemctl
Show all loaded services and their status
systemctl start nginx
Start the service nginx
systemctl stop nginx
Stopp the service nginx
systemctl restart nginx
Restart the service nginx completely new (disconnects ALL currently active connections)
systemctl reload nginx
Reload the current configuration for the service nginx neu ein (doesn’t disconnect ANY currently active connections)
systemctl status nginx
Show the current status of the service nginx
systemctl enable nginx
Add the service nginx to the autostart
systemctl disable nginx
Remove the service nginx from the autostart
I don’t have systemd in my linux distribution!
Dependent on your used linux distribution and version you might not have systemdinstalled and configured.
The most common distributions already have migrated to systemd over the last few years. Ubuntu since 2015, Debian since 2014, CentOS since 2014, Arch since 2012 and Fedora since 2011. See HERE for the current list.
Predecessor of the systemd was initd or SysVinit (again dependent on your used distribution)
Where can I find the config for all the already present services in systemd?
The config files for services, which come preinstalled and preconfigured by the distribution, can be found in /lib/systemd/system.
All config files for later installed services can be found in /etc/systemd/system.
Also every user can defined their own services in ~/.config/systemd/user.
The FTP protocol has been developed 1985 to transfer files over the IP protocol. The default FTP port is 21.
Main problem with FTP nowadays is the the fact, that the authentication is NOT ENCRYPTED and can therefore easily be captured if your computer is in the same network as someone with a running Packet-Sniffer like WireShark.
Therefore it is not recommended!
FTP with implicit SSL
FTP with implicit SSL is the next iteration of FTP which should fix the main problem – no encryption. Data transfer usually happens over the Port 990 but before sending the login credentials and further commands a SSL or TLS connection is being established (dependent on the server configuration). The base of the FTP prototoll still stays the same!
Dependent on the server configuration (mainly the used encryption method) you can use this method in a live/production environment.
FTP with explicit TLS
FTP with explicit TLS is more “flexible” than FTP with implicit SSL. First of all the connection is established via the default FTP port 21, but the client has the choice if it wants to just transfer the login data or everything over the TLS connection.
Main problem here is the encryption certificate needed. A valid, signed certificate for this transfer method can only be acquired via a certificate authority (which usually means you have to spend money). You can of course use a self-signed certificate, but on every client connecting to your sever there will be a warning that the used certificate is not signed.
In comparison SFTP doesn’t need any certificate since everything is handled via the SSH protocol.
SFTP
The SSH File Transfer Protocol doesn’t have anything in common with the old FTP protocol since it is based on the SSH protocol and all commands are being sent over one, encrypted connection.
Therefore this is currently the recommended way to transfer data from one PC to another via any network. Also its pretty easy to setup since the SFTP subsystem is present in the default installed SSH-Daemon on a linux system. You just have to activate it.
In comparison for any FTP connection you always have to (no matter if encrypted or not) install and configure a separate FTP server like z.B. VSFTP or ProFTP.
rsync
rsync is a program which is also based on the SSH protocol like SFTP. The main difference is, that only files are being transferred which have really been changed.
“rsync” is a program which enables you to synchronize 2 folders. Basically it’s a better version of “cp”. rsync is built on the SSH protocol to fo example handle authorization and authentication.
Can’t I just use FTP or SFTP?
FTP => NO, SFTP => OK but not as good as rsync
A detailed description of the most common file transfer methods can be found HERE.
Why is rsync better than SFTP if both are based on SSH?
Requirement: Rsync is installed on both sides, client and server.
The main difference here is, that rsync only transfers the changed files from one system to another. Rsync uses a special “delta codec algorithm” and therefore saves a lot of time and traffic.
How do i use rsync?
First you have to check if rsync is installed on both client and server. Via the command “rsync --version” you can check which version you are currently running. Currently it should be (September 2019) at Version 3.
Let’s image the following example:
Your current computer (PC1) has a local folder, which should be synced to another external computer (PC2).
Command
rsync -aP <source> <destination>
So we are logged in to PC1 and have a folder called “wordpress” in our home directory which we want to sync to the external computer PC2 into the directory /var/www/html. For our external computer PC2 we use as an example the address devguide.at and as a user “admin“.
What happens now? Depending on the SSH-Daemon settings of the external PC2 their could a password prompt or nothing happens.
But since we don’t want to enter the users password everytime we want to transfer something we can use the “Public-Key-Auth” so we don’t need to enter anything. See HERE for details.
So now we have configured our “Public-Key-Auth” and can login to the external PC without a password.
ssh admin@devguide.at
Now the following command should run through without any problems.
The difference here is the appended / at the end of the <source> part. It wouldn’t make a difference on the <destination> part if you append a / or not.
But I just want to download something from PC2 to my local PC1!
I just want the files from <source> in <destination> and nothing else!
Per default rsync never deletes anything from <destination> even if they are not present in <source>.
But there are situations when you want to delete any unwanted files from the <destination> and therefore just want to have the state of <source> being present after the transfer is complete.
Sometimes you do not have the possibility to edit or add files via a GUI.
To create or edit text files you need to use one of the many available terminal text editors. Some popular are:
Vi and Vim
EMACS
Nano
In the following examples I will explain how the “Vim” editor works, since I am used to it.
Is VIM already installed?
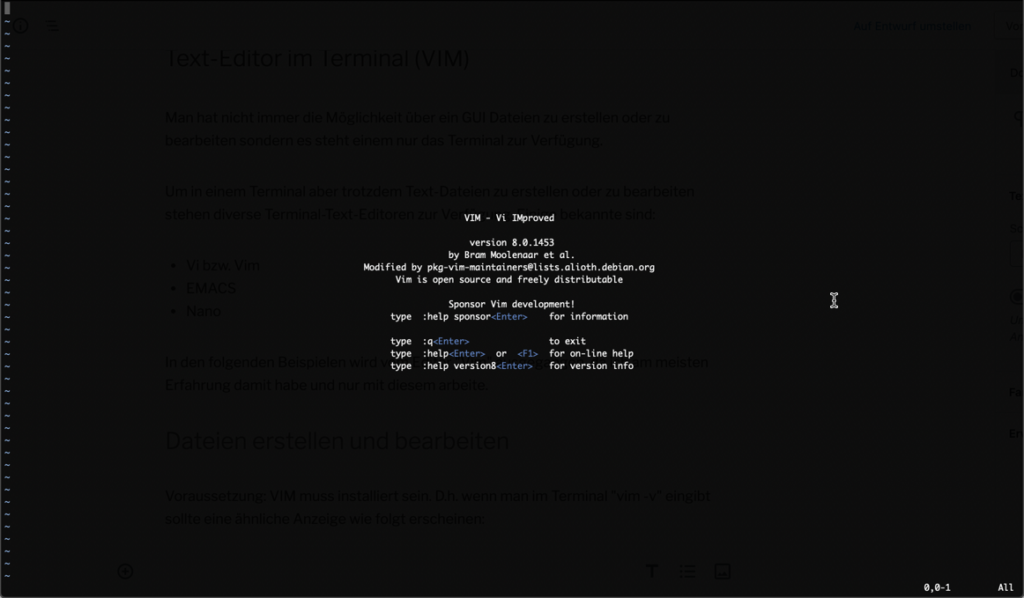
The easiest way to check if vi or vim is installed is via one of the following commands: “vim -v” or “vi -v“
If vim or vi is installed you should see something like that:
Create and edit files
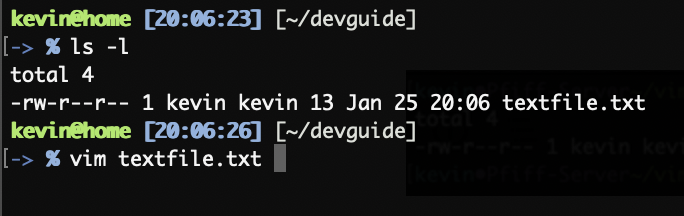
Already present files can be edited via:
vim <Filename>
After that the given files opens in the VIM Editor.
In the current “mode” we can not add or edit text directly as you are used to. Instead you have to change the “mode” into “Insert”-Mode.
The “Insert”-Mode can be activated via the letter “i”.
Now you can add and edit text via the “normal” way you are used to.
Saving and closing files
Now you probably would ask “How do I save the current file?”. There is no bar at the top that says something like “File” => “Save” or something like that.
To execute commands inside VIM we have to get out of the “Insert”-Mode. We can do that via the “ESC” key. After that the text “– INSERT –” at the bottom left of the terminal goes away.
Now we are in the “COMMAND”-Mode and therefore can execute commands
Command
Description
:w
Write
:q
Quit
u
Undo
y
Yank (Copy)
p
Paste
Therefore if we want to save and close the current file we have to input the following command:
:wq
These are the bare basics you need to use vim and therefore manage files in the terminal. A more in depth guide can be found here: https://www.howtoforge.com/vim-basics
Difference between Vi and Vim
“Vi” ca be installed on all POSIX systems, but this version just has the bare “essentiell” functionality built in.
“Vim” (= Vi IMproved) is an extended version of the “default” Vi editor which has built in functions.
A package manager is the part of linux operating system, which allows you to manage your installed software and add new software to your operating system.
Unfortunately there is no globally applicable package manager which can be used through all the distributions and therefore there is no unique way how software is installed in linux.
Currently there are 3 main package types:
.deb (short for “Debian binary packet”)
This format is used in all Debian based distributions like Ubuntu or Mint.
These packages are being handled via the “Debian Package Manager” (short DPKG).
.rpm (short for “RPM Package Manager” – yeah, kind of dumb)
This format is used in all Red Hat based distributions like Fedora or SUSE.
These packages are being handled by the “RPM Package Manager”.
.tar.xz
This format isn’t truly its own “package format” like .deb or .rpm. Instead its “just” a compressed archive which uses the compression algorithm “XZ”.
These “packages” are being handled via “Pacman”.
Software-Repositories
A software repository ist an online accessible lost of available software versions which are used to install or update a specific software in your operating system.
Dependent on the used distribution and what you want to do in linux you need to use more or less repositories.
“Secure Shell” (in short SSH) on one hand is a network protocol, on the other hand it is the software to create a secure, encrypted connection between 2 distant computers.
Requirements for SSH connectsions
The first requirement is a sever, which has an active and configured “SSH daemon” (short sshd) so a remote client can request an SSH session.
The second requirement is a client, which (dependent on your OS) is already preinstalled or has to be installed afterwards. MacOS and Linux have an SSH client pre installed, Windows needs something like Putty.
The third requirement is a network, which connects the server and the client so they can speak with each other. This connection can be directly over a LAN network or via the internet through many many routers.
How to create an SSH connection?
Lets define our example network:
Server: 192.168.0.1/24 Client: 192.168.0.2/24
Now we need the username and password which allows us to connect to the server.
Username: kevin Password: ********
On Linux or MacOS you can just open a terminal and enter the following command:
ssh kevin@192.168.0.1
The username is entered before the @ symbol, the host IP or domain name is entered after the @
ssh <username>@<host>
After that you are asked to enter the password of the required user. Don’t get confused if you don’t see any letters or * on the screen, the terminal knows what you are typing, its just not outputting the content on the terminal for security reasons.
If you put in the correct password you are now logged in on the server via SSH.
Alternative authentication method – Public-Key-Auth
As we all know a username and password can be “leaked” very quickly and therefore is not the safest way to authenticate a user.
A good alternative is the method of “Public-Key Authentication”.
Basic principal is the following:
The client creates a key pair – a “public” and a “private” Key. As you can probably image, the private key should NOT be shared in any way possible. The public key will be configured on the server to grant you access to a given user without having to know the password.
Creating a key pair (Linux and MacOS)
ssh-keygen -t rsa
After entering the command you will be asked where the key pair should be saved and if the private key should have an additional password to use it. Usually you should keep the default path for the SSH key pair (~/.ssh/), if you want to use a password for your private key is on you.
The folder ~/.ssh/ now has 2 files:
id_rsa
Private key
id_rsa.pub
Public key
You can choose which type of cryptography is used behind each key pair when you create the SSH key pair.
Most common methods are:
RSA
ECDSA
ed25519
But dependent on how up2date your server and or client are you can only use some older or newer cryptography methods.
How to add my public key to my server?
As seen above you can find your public key in ~/.ssh/id_rsa.pub
MacOS or Linux only: You can also copy the content of a file to your clipboard via the command pbcopy:
pbcopy < ~/.ssh/id_rsa.pub
Now connect to your server (via username and password or something like FTP) and create the following file:
~/.ssh/authorized_keys
Now can enter your previously copied public key into this file. Here it is important that one line in this file should be one public key. So if you have multiple public keys (because you have many computers having access to your server) just enter each public key in a new line.
Example
On the client (192.168.0.2) we created a key pair in ~/.ssh/ and we already copied the public key.
Now we connect to our server via ssh kevin@192.168.0.2 and the predefined password.
Now we open the file ~/.ssh/authorized_keys with for example VIM and input our copied public key – save and quit the file after that.
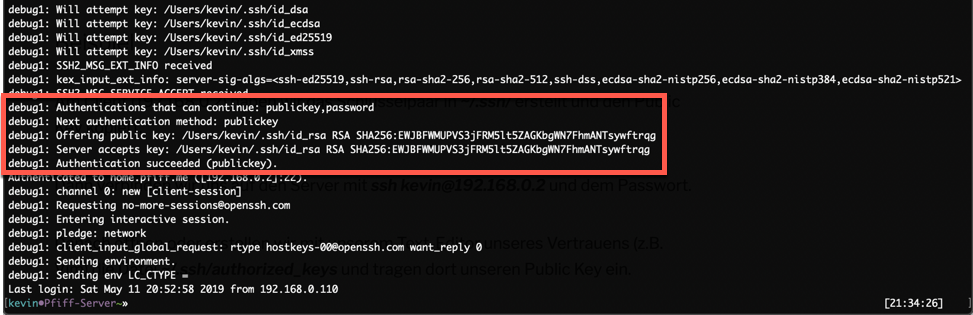
If everything is working correctly you should be able to login to the server WITHOUT ENTERING YOUR PASSWORD.
You can check that via the “verbose output” of the ssh command: