What is a webserver?

A webserver delivers data over the HTTP protocoll to a web browser. Typically these are HTML, CSS, JavaScript and image files.

Dependent on the chosen webserver you can use scripting languages or deliver dynamic data with for example:

  • PHP
  • JS
  • ASP
  • JSP

Typical webserver implementations:

  • Apache
  • NGINX
  • Cloudflare
  • Microsoft ISS
  • NodeJS
  • Tomcat (Java)
  • lighthttpd

Currently the distribution of webservers (22nd february 2020) is:

Source: https://en.wikipedia.org/wiki/Web_server

Apache

The Apache HTTP server ist a free to use, open source webserver which has been published in 1995 and is currently the most used webserver (February 2020 – see “What is a webserver?“).

The installations process for the Apache webserver is mostly different on every linux distribution. In the following example I will show you how to install it on a Debian/Ubuntu based system.

sudo apt-get install apache2

After that you should be able to check the Apache2 version with:

apache2 -v

As usual in Debian based distributions the config files are located in /etc/apache2

In this folder we have the following files and folders:

  • apache2.conf
    • General Apache2 config file
  • conf-available
    • Contains additional config files which can be added to the default config
  • conf-enabled
    • Contains symbolic links to the “conf-available” which to show which configs should be enabled and which not.
  • envvars
    • Environment config for the Apache2
  • mods-available
    • same as conf-available just for Apache2 modules
  • mods-enabled
    • same as conf-enabled just for Apache2 modules
  • ports.conf
    • contains settings on which ports the server should listen
  • sites-available
    • same as conf-available just for vHost configs
  • sites-enabled
    • same as conf-available just for vHost configs
  • magic
    • Rules on which MIME-Types should be detected

Standard Apache vHost config

Folder: /etc/apache2/sites-available/<filename>

<VirtualHost *:80>
    ServerName www.domain.com
    ServerAlias domain.com
    DocumentRoot /var/www/html/docroot
</VirtualHost>

Explenation

  • VirtualHost *:80
    • Listen on the port 80
  • ServerName www.domain.com
    • Use this configuration if the hostname is “www.domain.com”
  • ServerAlias domain.com
    • Also use this configuration if the hostname is “domain.com”
  • DocumentRoot /var/www/html/docroot
    • Show the content of the folder “/var/www/html/docroot”

Activate a new vHost config

ln -s /etc/apache2/sites-available/<Dateiname> /etc/apache2/sites-enabled/<Dateiname>

Test the new Apache vHost config

apache2ctl configtest

Restart the Apache webserver

apache2ctl restart

Add a PHP-Handler

In Ubuntu/Debian based systems its pretty easy since its just a package which you can install via apt-get.

sudo apt-get install -y php7.2-curl php7.2-gd php7.2-json php7.2-mbstring php7.2-mcrypt libapache2-mod-php7.2

The most important package here is “libapache2-mod-php7.2” which connects the globally installed PHP and the Apache webserver. See mod_php for more details.

Instead of php7.2 you can of course use php7.3 or any other future PHP version.

If everything went well you can restart the webserver with apachectl restart and create a new file /var/www/html/info.php with the following content:

<?php phpinfo();

After that you can open your webbrowser and open the following URL

http://<Server-IP>/info.php

Now you should see a PHP-Info page.

NGINX

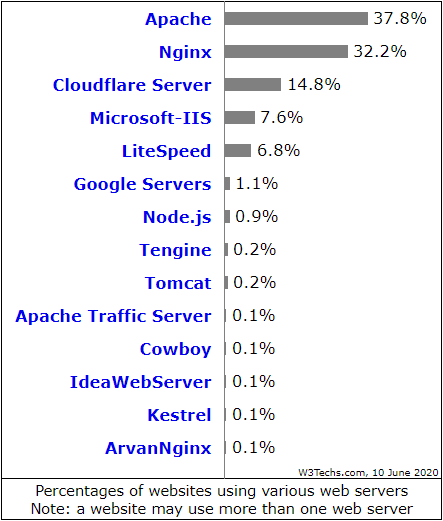
NGINX is a free to use, open source webserver which has been invented in 1999 by Igor Sysoev and ist currently the number 2 of the most used webservers (February 2020 – see „What is a webserver?„).

Why do you need any other webserver then Apache?

NGINX was created primarily because of the “C10k Problem”.

The “C10k Problem” is about optimizing and handling a large amount of network sockets.

C => Connection | 10k => 10.000

NGINX with its event based, async architecture was the base for future “high performance” server software and was therefore declared the fastest available webserver.

Installation and configuration

As mentioned in the apache installation process this can be different on your used linux distribution but the following example is based on a Debian/Ubuntu distribution.

sudo apt-get install nginx

After that you can check the installed version with the following command:

nginx -v

Similar to other linux packages the configuration files for NGINX are located in /etc/nginx.

Here we can find the following files and folders:

  • conf.d/
    • Directory to add additional configuration files
  • fastcgi.conf & fastcgi_params
    • Sets default parameters for FastCGI requests
  • mime.types
    • Mapping for file endings and their associated MIME-Type
  • modules-available/
    • Contains modules which are available to include into NGINX
  • modules-enabled/
    • Contains symlinks to the modules (in modules-available) which should actually be “activated” in NGINX
  • nginx.conf
    • Base NGINX-Config File
    • Here all activated modules, configurations and vHosts are being loaded
  • proxy_params
    • Default Proxy parameters can be found here
  • scgi_params
    • Sets default SCGI parameters
  • sites-available/
    • Contains configuration files for each vHost
  • sites-enabled/
    • Same as “modules-enabled” just for vHost files
  • snippets/
    • Contains snippets for how to use PHP files over FastCGI and how to use a self signed HTTPS certificate

Not so important files

  • uwsgi_params
  • koi-utf
    • Mapping for “KOI8-R” (Cyrillic) to “UTF-8” characters
  • koi-win
    • Mapping for “KOI8-R” (Cyrillic) to “Windows-1251” characters
  • win-utf
    • Mapping for “Windows-1251” to “UTF-8” characters

Create a new vHost

In /etc/nginx/sites-available there is a “default” file

This basically contains the following (comments (#) have been removed)

server {
	listen 80 default_server; # IPv4 listen on Port 80
	listen [::]:80 default_server; # IPv6 listen on Port 80

	root /var/www/html; # Absolute path to Document-Root

	# Set default files to show when accessing the website
	# Add index.php to the list if you are using PHP
	index index.html index.htm index.nginx-debian.html;

	server_name mydomain.at; # the domain name

	location / {
		# First attempt to serve request as file, then
		# as directory, then fall back to displaying a 404.
		try_files $uri $uri/ =404;
	}

	# pass PHP scripts to FastCGI server
	#
	#location ~ \.php$ {
	#	include snippets/fastcgi-php.conf;
	#
	#	# With php-fpm (or other unix sockets):
	#	fastcgi_pass unix:/var/run/php/php7.0-fpm.sock;
	#	# With php-cgi (or other tcp sockets):
	#	fastcgi_pass 127.0.0.1:9000;
	#}

	# deny access to .htaccess files, if Apache's document root
	# concurs with nginx's one
	#
	#location ~ /\.ht {
	#	deny all;
	#}
}

If you want to activate your configuration you have to create a “Symlink” in the folder /etc/nginx/sites-enabled.

sudo ln -s /etc/nginx/sites-available/default /etc/nginx/sites-enabled/default

Or if you want to deactivate an already activated config:

unlink /etc/nginx/sites-enabled/default

Before you restart the NGINX server you should check your config syntax if you got any typos or wrong syntax:

nginx -t

After each change in the NGINX config you have to realod the NGINX to see the effect of the config chage

systemctl reload nginx

Source: https://www.nginx.com/resources/glossary/nginx/

Free HTTPS certificate with Lets Encrypt

Valid HTTPS certificates are necessary to show the lock beside of your URL.

Types of Certificates

  • Self-Signed Certificates
    • Everyone can create certificates and implement them in their websites.
    • But these will NOT be marked as “secure” and therefore don’t get a lock symbol.
    • To use these certificates every client has to mark these certificate as “secure” once in their system..
  • Wildcard Certificate
    • Are often used for Subdomain Certificates so you don’t have to create a new certificate when you add a new subdomain to your server.
    • Example: *.pfiff.me
  • Domain Validation (DV)
    • Here the applicant is being checked if he is actually the owner of the given domain. No other information like the identity of the company is being checked and therefore no other information is being displayed in the certificate.
    • Wildcard-Certificates are possible!
    • This is the default approach for LetsEncrypt certificates.
  • Organization Validation (OV)
    • Basically the same as a DV but additionally the companies name and locations is being checked. These information are then being displayed in the certificate.
    • Wildcard-Certificates are possible!
  • Extended Validation (EV)
    • Same as OV, but it’s a more detailed check of the company.
    • In the past with an EV certificate the name of the company was being displayed next to the lock but this feature has been removed from every currently common browser (Chrome, Firefox, Safari etc.). Therefore its debatable if this option is a good choice.
      See https://www.troyhunt.com/extended-validation-certificates-are-dead/
    • Wildcard-Certificates are NOT possible!

What is a “Certificate Authority” (CA)?

A “Certificate Authority” (short CA) is necessary to check certificates with specific, predefined methods and if that validation has been successful to sign these certificates. Additionally on each validation the certificate a date will be set when the certificate is being expired. After that period the certificate has to be checked and signed again.

In the past it was only possible to buy HTTPS certificates. But since 2015 “LetsEncrypt” or better the python script “Certbot” which makes this process way easier.

LetsEncrypt uses the “Domain-Vaildation” (DV) process. Therefore everyone, who is the owner a domain and shows the domain to a server, a signed LetsEncrypt certificate can be generated for this server to use this domain.

What is Certbot?

Certbot ist a software, which automatically generated and manages HTTPS certificates.

Currently there are even plugins available for the 2 mostly used webservers (Apache and NGINX), which even handle the configuration for the vhost files to include the certificate.

The easiest way to use certbot is to go to https://certbot.eff.org, enter your OS and your uses webserver and follow the instructions.

Usually a certificate generated by Certbot/LetsEncrypt is valid for 90 days. But Certbot checks the status of each installed certificate regularly and automatically renews certificates which will get expired in 30 days.

Therefore you only need to create and install your certificates once and everything else is handled by certbot.

Informations of a certificate

Source: https://www.digitalocean.com/community/tutorials/a-comparison-of-let-s-encrypt-commercial-and-private-certificate-authorities-and-self-signed-ssl-certificates