This variable contains following text: Testvariable
In this example a basic variable is being defined and directly after that being outputted via “echo” after the text “This variable contains following text: “.
Due to the fact that PHP is a scripting language the content of the PHP file is being processed on every request. In contrast Java or C need to be “compiled” into machine code before it can be executed.
PHP offers quite a few functionalities out of the box – for example:
Filesystem operations (Create/Edit/Delete folders or files etc.)
String manipulation (Create/Edit/Delete text etc.)
XML operations (Create/Edit/Delete XML data structures etc.)
and much more
These are just some basic which you can basically can find in any “Default PHP” installation. But PHP has so called “PHP modules” to extend the functionality PHP offers.
Popular PHP modules are:
XDebug (Extended Debug functionality)
OPCache (Saves precompiled bytecode from PHP in RAM instead of recompiling it on every request => performance boost)
MBString (Adds the ability to handle “MultiByte Strings” in PHP – e.g. Emoji Icons)
GD (Image editing in PHP like rotating or converting)
Everywhere in software development we have versions which evolve over time to improve performance, fix security issues and add new functionality. The following list contains a short overview of the changes from PHP 7.1 to 8.1.
PHP 5.6 and 7.0 will not be included here because they are no longer being supported (php.net) (April 2019)
PHP 8.1
Native ENUM support
It now is possible to (similar to other modern programming languages like Kotlin, Rust or Swift) to define ENUMs (short for enumerated types).
A simple case of an ENUM is the following
enum TransportMode {
  case Bicycle;
  case Car;
  case Ship;
  case Plane;
  case Feet;
}
and can be used like this
function travelCost(TransportMode $mode, int $distance): int
{ /* implementation */ }

$mode = TransportMode::Boat;

$bikeCost = travelCost(TransportMode::Bicycle, 90);
$boatCost = travelCost($mode, 90);

// this one would fail: (Enums are singletons, not scalars)
$failCost = travelCost('Car', 90);
But you can also set scalar values for each case inside the ENUM:
enum Metal: int {
  case Gold = 1932;
  case Silver = 1049;
  case Lead = 1134;
  case Uranium = 1905;
  case Copper = 894;
}
BUT there are some rules you have to follow when setting scalar values:
If you set one scalar value to 1 case then ALL cases need to have one. So either none have one or all have one, nothing in between.
Scalar values (just like the case itself)need to be unique.
The scalar values are read only
To access the scalar value of an ENUM case you can do that via Metal::Gold->value
The never return type
Till now it was not possible to prevent functions from every returning anything. There was/is the void type but it doesn’t care if you either exit or just don’t return anything.
Forcing to exit can now be done via the new never return type:
function shutdown(): never {
    exit();
}
But also implicit exit calls are allowed like:
function redirectToHome(): never {
    redirect('/');
}
Fibers (Non-Blocking/asynchron PHP)
For all those developers who have doven into the World of e.g. NodeJS this topic may be a little strange. Basically PHP is written so all the lines of code are performed synchroniously. So like line 2 only gets executed after line 1 is done.
This however now can be changed via using fibers in PHP 8.1.
Asynchron PHP already has been somewhat available via external packages like amphp, ReactPHP or Guzzle but there was no standardized way of doing it (till now).
Now you are able to set a property to be readonly. This means, that it only can be initialized once and can never be changed after that.
class Release {
    public readonly string $version;

    public function __construct(string $version) {
        // Legal initialization.
        $this->version = $version;
    }
}
Whats the difference with defining a const property?
public readonly string $version; means, that the value of the property can differ from each object initialization of the type Release.
But public const string $version; means, that all objects created of the type Release must have the same value.
PHP 8.0
JIT (Just in Time Compiler)
Without going too much into detail PHP 8.0 added a JIT Compiler which improves the performance of your PHP app “under certain conditions”. Unfortunately these conditions are not related to typicall CMS (like WordPress) usage and more “numeric” or “calulating” tasks.
Till now properties needed to be initialized like so:
class Car {
    public int $wheels;
    public int $doors;

    public function __construct(
        int $wheels = 4,
        int $doors = 5
    ) {
        $this->wheels = $x;
        $this->doors = $y;
    }
}
But the exactly same logic can now be writte in a much smaller footprint:
class Carr {
    public function __construct(
        public int $wheels = 4,
        public int $doors = 5
    ) {}
}
Union Types
The only union type present before PHP 8.0 was the?Type to allow null values as well as the default Type.
Otherwise you would have to add PHPDoc Union Types so static analysis tools like PHPStan understand the code better.
/**
 * @property int|float $power
 */
class Car {
    private $power;

    /**
     * @param int|float $power
     */
    public function setPower($power) {
        $this->power = $power;
    }

    /**
     * @return int|float
     */
    public function getPower() {
        return $this->power;
    }
}
Now you are abe to set these kind of Union Types directly in the property type, parameter type and return type.
class Number {
    private int|float $number;

    public function setNumber(int|float $number): void {
        $this->number = $number;
    }

    public function getNumber(): int|float {
        return $this->number;
    }
}
PHP 8.0 in general focused on a more stricter typing system and typing features.
Named attributes
Defininig parameters inside your function required them to be in an order which seems logical so calling that functions is easier:
function calc($start, $end, $steps) {
    ...
}
so you could call it like that:
calc(10, 100, 5);
But now you can also do it like that:
calc(end: 100, start: 10, steps: 5);
Or even combine position oriented and named attributes like that:
calc(10, steps: 5, end: 100);
With this apporach you still have to position the not named attributes at the correct position!
Nullsafe-Operator
Sometimes you only wan’t call a specific method on an object if it is actually present/not null.
So if $a is null the methode b() will not be called and $result will be null.
New string compare functions
I regularely have to perform string operations to check if e.g. a given string is present inside another or if one string starts with a specific string.
Till now you had to use the strpos() function and depending on the return value build your logic which is not always very readable code.
With PHP 8.0 these pretty self explenatory functions have been introduced
str_contains( $haystack, $needle )
str_starts_with( $haystack, $needle )
str_ends_with( $haystack, $needle )
So you can write more readable and understandable code.
PHP 7.4
Spread-Operator for Arrays
Calling functions with a variable amount of arguments is nothing new for us.
function my_function(...$args) { var_dump($args); }
my_function('test', true, 123);

// Result
array(3) {
  [0]=>
  string(4) "test"
  [1]=>
  bool(true)
  [2]=>
  int(123)
}
But this functionality is now also available for array operations.
class User {
/** @var int $id */private $id;
/** @var string $name */private $name;
publicfunction __construct(int $id, string $name) {
$this->id = $id;
$this->name = $name;
}
}
into this
class User {
    public int $id;
    public string $name;
}
The following types are being allowed:
bool
int
float
string
array
object
iterable
self
parent
Any class or interface
nullable types (?type)
But neither void nor callable are allowed by definition!
Preloading
Without getting to complicated OPCache preloading improves PHP performance by always keeping the main libraries cached in the OPCache instead of reloading them every time a PHP process is being started.
This setting needs to be set in the php.ini
PHP 7.3
Trailing Commas are allowed in Calls
With PHP 7.3. it is now allowed to have a trailing comma even if it is the last parameter in a function call.
my_function(
    $param1,
    $param2,
);
JSON_THROW_ON_ERROR
Till now json_decode() returns null if an error occurs. But null can also be a valid result, which can lead to confusion.
So now you can check for json errors with these functions:
json_last_error()
Returns (if present) the last error, which has occurred on the las encoding/decoding process for a JSON.
json_last_error_msg()
Return “No error” if the encode /decode was a success and FALSE if there were problems.
An anonymous user has written a very nice helper function on the json_last_error_msg() definition page on php.net:
$array = [1,2,3,4,5,6,7,8];

if(is_countable($array)){
  foreach($array as $value){

  }
}
array_key_first(), array_key_last()
Till now it was not “easy” to get the first and last “key” of an array. But with PHP 7.3 you now have the functions array_key_first()and array_key_last().
PHP 7.2
Native support for BMP image format
Since PHP 7.2 the GD extension allows to handle .bmp images.
Typ “object” bei Parameter- und Rückgabewerten einstellbar
A new type, object, has been introduced that can be used for parameter typing and return typing of any objects.
function test (object $a): object {

}
Enhancements to the EXIF extension
EXIF (Exchangeable Image File Format) is a standard to save metadata in image files.
Till now the automatically parsed EXIFF data for images files was very limited. With PHP 7.2 many EXIF formats from well known camera suppliers have been added. See HERE
Encrypted ZIP-Archives
With PHP 7.2 you can now create ZIP archives with a password protection.
PHP 7.1
“Nullable types”
function test1(?array $a) {

}

function test2($a): ?array {

}
The first function (test1) defines, that the first parameter can have the type “Array”, but can also be “null” (? before the array)
The second function (test2) defines, that the return value can have the type “Array”, but also “null” too.
Without the prefixed ? the function test1 called with a parameter “null” or the second function test2 with a return value of “null” would lead into a “Fatal Error” when executing that code.
The functions of the “mcrypt” extension (function names all start with “mcrypt_”) will be marked as “deprecated” markiert and therefore produce a line in the error.log.
There are different ways how a web server can handle PHP files. Following are the most common implementations how this is done:
mod_php
“mod_php” is a module for the web-server “Apache”.
With this module PHP is therefore “integrated” into the web-server. So there is no extra PHP-Process which handles the PHP interpretation. Instead everything is handled by the Apache process.
The main advantage for using “mod_php” is performance. Compared to CGI you usually gain 300-500% when changing to mod_php.
Main reason for that is the ability to cache PHP modules, or specifically the configuration which usually (in CGI and FastCGI) has to be parsed on every request.
How do I know, if mod_php is being used?
Since mod_php is a web-server module it needs to be present in the web-server config which looks something like that
LoadModule php7_module modules/mod_php.so
The following entry was located on my Ubuntu server under/etc/apache2/mods-available/php7.4.load
The “Common Gateway Interface” (short CGI) implementation means, that the web-server starts an extra PHP process for each request. Therefore all PHP modules, the php.ini and all other configuration needs to be loaded and parsed on every request, which is inefficient.
Main advantage for using CGI is the complete separationbetween the executing web-server Code and the PHP code.
FastCGI
FastCGI is a PHP implementation, which contains the security advantages from CGI but also being efficient like mod_php.
Here we don’t start a new PHP process on every request, instead we use “ready made” PHP interpreter instances which only get the PHP files passed on to be handled.
How do I know, if FastCGI is being used?
There are multiple ways how you can implement FastCGI in the web-server config. One example would be to send all .php request to a lokal PHP-CGI binary:
So here all .php files requested by the webserver are going to call the PHP-CGI binary located in /home/devguide/php-install-directory/php-cgi. Usually this binary is being installed when you install the general PHP package but it could also be a separate package.
The phpinfo() shows you the following for FastCGI:
Server API
CGI/FastCGI
FPM
The „PHP-FastCGI Process Manager“ (short PHP-FPM) is an alternative to the FastCGI implementation.
Here the main difference is, that there is always a “parallel” PHP-FPM Process which is connected to the web-server process.
FPM uses its own service to manage the FPM-Pools. Therefore if you can see the running services on your server (e.g. via top or htop) you can pretty easily detect the PHP-FPM service.
The phpinfo() will show you the following for FPM:
The “PHP-FastCGI Process Manager” (short PHP-FPM) is an alternative FastCGI Implementation for PHP in a web-server.
Here we always have (at least) one PHP-FPM process parallel to the web-server process which handles PHP interpretation.
FPM processes group up into different “pools”. In these pools there will usually be several proccess created which handle PHP interpretation for a specific web page.
The amount of these processes and many more settings can be set in the FPM configuration (see bellow).
The “listen” defines where the linux socket should be placed in the file system. This socket will be created after the PHP-FPM process has been restarted.
Via this socket the web-server can redirect PHP interpretation to the FPM process (see bellow)
Web-Server Configuration (NGINX)
The web-server has to know how and where it should send PHP-Files to the corresponding PHP process.
This is an example for: /etc/nginx/sites-available/<domain-name>.conf
server {
    listen 443 ssl http2; # managed by Certbot
    listen [::]:443 ssl http2;

    ssl_certificate /etc/letsencrypt/live/<domain-name>/fullchain.pem; # managed by Certbot
    ssl_certificate_key /etc/letsencrypt/live/<domain-name>/privkey.pem; # managed by Certbot
    include /etc/letsencrypt/options-ssl-nginx.conf; # managed by Certbot
    ssl_dhparam /etc/letsencrypt/ssl-dhparams.pem; # managed by Certbot

    root <path-to-docroot>;
    server_name <domain-name>;

    index index.html index.htm index.php;

    location / {
        try_files $uri $uri/ /index.php?$args;
    }

    location ~ \.php$ {
        include snippets/fastcgi-php.conf;
	fastcgi_pass unix:/run/php/<fpm-socket-name>.sock;
    }

    error_log <path-to-logs>/error.log warn;
    access_log <path-to-logs>/access.log apm;
}

server {
    if ($host = <domain-name>) {
        return 301 https://$host$request_uri;
    } # managed by Certbot

    listen 80;
    listen [::]:80;

    server_name <domain-name>;
    return 404; # managed by Certbot
}
The following line is responsible for the “redirection” to the FPM process:
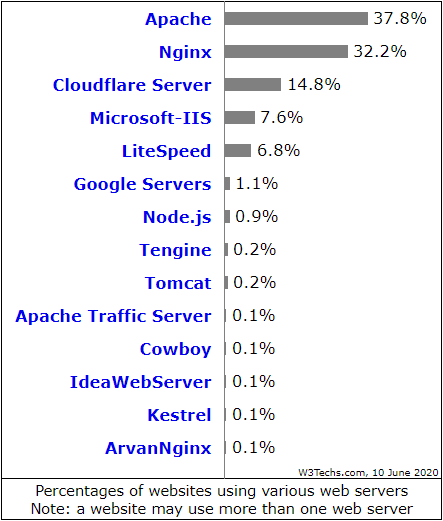
The Apache HTTP server ist a free to use, open source webserver which has been published in 1995 and is currently the most used webserver (February 2020 – see “What is a webserver?“).
The installations process for the Apache webserver is mostly different on every linux distribution. In the following example I will show you how to install it on a Debian/Ubuntu based system.
sudo apt-get install apache2
After that you should be able to check the Apache2 version with:
apache2 -v
As usual in Debian based distributions the config files are located in /etc/apache2
In this folder we have the following files and folders:
apache2.conf
General Apache2 config file
conf-available
Contains additional config files which can be added to the default config
conf-enabled
Contains symbolic links to the “conf-available” which to show which configs should be enabled and which not.
envvars
Environment config for the Apache2
mods-available
same as conf-available just for Apache2 modules
mods-enabled
same as conf-enabled just for Apache2 modules
ports.conf
contains settings on which ports the server should listen
The most important package here is “libapache2-mod-php7.2” which connects the globally installed PHP and the Apache webserver. See mod_php for more details.
Instead of php7.2 you can of course use php7.3 or any other future PHP version.
If everything went well you can restart the webserver with apachectl restart and create a new file /var/www/html/info.php with the following content:
<?php phpinfo();
After that you can open your webbrowser and open the following URL
NGINX is a free to use, open source webserver which has been invented in 1999 by Igor Sysoev and ist currently the number 2 of the most used webservers (February 2020 – see „What is a webserver?„).
Why do you need any other webserver then Apache?
NGINX was created primarily because of the “C10k Problem”.
The “C10k Problem” is about optimizing and handling a large amount of network sockets.
C => Connection | 10k => 10.000
NGINX with its event based, async architecture was the base for future “high performance” server software and was therefore declared the fastest available webserver.
Installation and configuration
As mentioned in the apache installation process this can be different on your used linux distribution but the following example is based on a Debian/Ubuntu distribution.
sudo apt-get install nginx
After that you can check the installed version with the following command:
nginx -v
Similar to other linux packages the configuration files for NGINX are located in /etc/nginx.
Here we can find the following files and folders:
conf.d/
Directory to add additional configuration files
fastcgi.conf & fastcgi_params
Sets default parameters for FastCGI requests
mime.types
Mapping for file endings and their associated MIME-Type
modules-available/
Contains modules which are available to include into NGINX
modules-enabled/
Contains symlinks to the modules (in modules-available) which should actually be “activated” in NGINX
nginx.conf
Base NGINX-Config File
Here all activated modules, configurations and vHosts are being loaded
proxy_params
Default Proxy parameters can be found here
scgi_params
Sets default SCGI parameters
sites-available/
Contains configuration files for each vHost
sites-enabled/
Same as “modules-enabled” just for vHost files
snippets/
Contains snippets for how to use PHP files over FastCGI and how to use a self signed HTTPS certificate
Mapping for “KOI8-R” (Cyrillic) to “UTF-8” characters
koi-win
Mapping for “KOI8-R” (Cyrillic) to “Windows-1251” characters
win-utf
Mapping for “Windows-1251” to “UTF-8” characters
Create a new vHost
In /etc/nginx/sites-available there is a “default” file
This basically contains the following (comments (#) have been removed)
server {
	listen 80 default_server; # IPv4 listen on Port 80
	listen [::]:80 default_server; # IPv6 listen on Port 80

	root /var/www/html; # Absolute path to Document-Root

	# Set default files to show when accessing the website
	# Add index.php to the list if you are using PHP
	index index.html index.htm index.nginx-debian.html;

	server_name mydomain.at; # the domain name

	location / {
		# First attempt to serve request as file, then
		# as directory, then fall back to displaying a 404.
		try_files $uri $uri/ =404;
	}

	# pass PHP scripts to FastCGI server
	#
	#location ~ \.php$ {
	#	include snippets/fastcgi-php.conf;
	#
	#	# With php-fpm (or other unix sockets):
	#	fastcgi_pass unix:/var/run/php/php7.0-fpm.sock;
	#	# With php-cgi (or other tcp sockets):
	#	fastcgi_pass 127.0.0.1:9000;
	#}

	# deny access to .htaccess files, if Apache's document root
	# concurs with nginx's one
	#
	#location ~ /\.ht {
	#	deny all;
	#}
}
If you want to activate your configuration you have to create a “Symlink” in the folder /etc/nginx/sites-enabled.
Valid HTTPS certificates are necessary to show the lock beside of your URL.
Types of Certificates
Self-Signed Certificates
Everyone can create certificates and implement them in their websites.
But these will NOT be marked as “secure” and therefore don’t get a lock symbol.
To use these certificates every client has to mark these certificate as “secure” once in their system..
Wildcard Certificate
Are often used for Subdomain Certificates so you don’t have to create a new certificate when you add a new subdomain to your server.
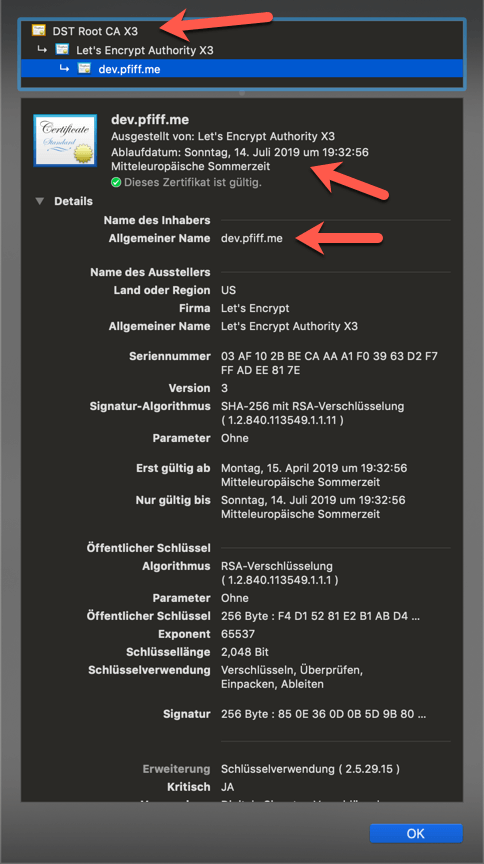
Example: *.pfiff.me
Domain Validation (DV)
Here the applicant is being checked if he is actually the owner of the given domain. No other information like the identity of the company is being checked and therefore no other information is being displayed in the certificate.
Wildcard-Certificates are possible!
This is the default approach for LetsEncrypt certificates.
Organization Validation (OV)
Basically the same as a DV but additionally the companies name and locations is being checked. These information are then being displayed in the certificate.
Wildcard-Certificates are possible!
Extended Validation (EV)
Same as OV, but it’s a more detailed check of the company.
In the past with an EV certificate the name of the company was being displayed next to the lock but this feature has been removed from every currently common browser (Chrome, Firefox, Safari etc.). Therefore its debatable if this option is a good choice. See https://www.troyhunt.com/extended-validation-certificates-are-dead/
Wildcard-Certificates are NOTpossible!
What is a “Certificate Authority” (CA)?
A “Certificate Authority” (short CA) is necessary to check certificates with specific, predefined methods and if that validation has been successful to sign these certificates. Additionally on each validation the certificate a date will be set when the certificate is being expired. After that period the certificate has to be checked and signed again.
In the past it was only possible to buy HTTPS certificates. But since 2015 “LetsEncrypt” or better the python script “Certbot” which makes this process way easier.
LetsEncrypt uses the “Domain-Vaildation” (DV) process. Therefore everyone, who is the owner a domain and shows the domain to a server, a signed LetsEncrypt certificate can be generated for this server to use this domain.
What is Certbot?
Certbot ist a software, which automatically generated and manages HTTPS certificates.
Currently there are even plugins available for the 2 mostly used webservers (Apache and NGINX), which even handle the configuration for the vhost files to include the certificate.
The easiest way to use certbot is to go to https://certbot.eff.org, enter your OS and your uses webserver and follow the instructions.
Usually a certificate generated by Certbot/LetsEncrypt is valid for 90 days. But Certbotchecks the status of each installed certificate regularly and automatically renews certificates which will get expired in 30 days.
Therefore you only need to create and install your certificates once and everything else is handled by certbot.